Normal Map in Unity

Minh Khoa
Author
Summary:Normal Map is a technique that "tricks" light so a flat surface appears to have raised and recessed details, withoutneeding extra polygons. This article will help you understand how Normal Maps work, how to use them in Unity, and common mistakes.
 --
--
1. What is a Normal Map?
Imagine you have a flat wall in a game. If you want it to look like protruding bricks, you have 2 ways:
- **Method 1:**Create a 3D model with thousands of polygons for each brick → heavy, costly in performance.
- **Method 2:**Use a special image (Normal Map) to "lie" to the light that the surface is not flat → light, efficient.
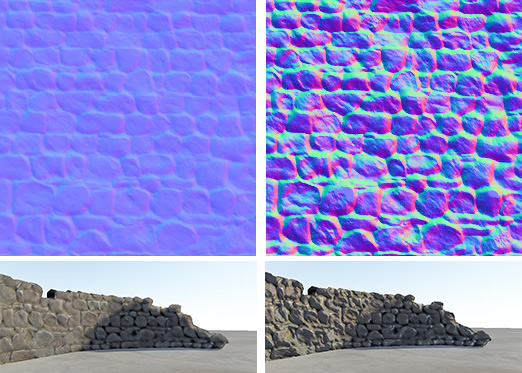
Normal Map is method 2.It is a texture where each pixel storesdirection (direction) of the surface at that point, instead of color. When light shines on it, the shader uses this direction information to calculate shadows and reflections — creating the illusion of 3D detail.
Why are Normal Maps usually blue-purple?
Each pixel in a Normal Map encodes 3 values (X, Y, Z) into 3 color channels (R, G, B):
| Channel | Axis | Meaning |
|---|---|---|
| R (Red) | X | Left/right direction |
| G (Green) | Y | Up/down direction |
| B (Blue) | Z | Outward direction (perpendicular to the surface) |
Most surface normals point straight outward (Z = 1), so the B channel is always near max → the image has the characteristicblue/purpletone.
2. How it works (simply)
Không có Normal Map:
  Ánh sáng → Bề mặt phẳng → Bóng đổ đều → Trông phẳng lì

Có Normal Map:
  Ánh sáng → Đọc hướng từ Normal Map → Mỗi pixel phản xạ khác nhau → Trông lồi lõm
In essence, a Normal Mapdoes not change the actual shapeof the mesh. It only changes how light interacts with the surface. If you look at the (edge) of the object, you will see it is still flat.
3. Tangent Space vs Object Space vs World Space
Tangent Space (most common — 90% of cases)
- The direction is calculatedrelativelyto the mesh surface.
- Can be reused for many different objects.
- This is the default type in Unity.
- The image has the characteristicblue-purpletone.
Object Space
- The direction is calculated according tothe object's coordinates.
- The image has more colors (red, green, and blue are all clearly visible).
- Cannotbe reused if the mesh is deformed (skinned mesh, animation).
- Used for static objects, not animated.
World Space
- Direction followsworld coordinates.
- Rarely used, mainly for terrain or special effects.
Conclusion:In Unity, 99% of the time you will useTangent Space. Just remember this type.
4. How to use Normal Maps in Unity
Step 1: Import texture
Drag the Normal Map image file into the project. Unity will automatically recognize it if the file name contains_Normalor_N.
Step 2: Configure Import Settings
Select the texture in the Inspector:
Texture Type:     Normal map        ← BẮT BUỘC phải chọn đúng
                                      (nếu để Default, kết quả sẽ sai)

Create from Grayscale:  ☐            ← Tick nếu ảnh input là ảnh xám (height map)
                                      (Unity sẽ tự chuyển thành Normal Map)

Bumpiness:        0.0 - 10.0         ← Chỉ hiện khi tick "Create from Grayscale"
                                      Độ mạnh của hiệu ứng lồi lõm

Filter Mode:      Bilinear / Trilinear
Max Size:         Tuỳ nhu cầu (512, 1024, 2048...)
Compression:      Normal Quality
Important note:When you select
Texture Type = Normal mapUnity will automatically pack the texture in the optimal format for each platform (for example: DXT5nm on PC, ASTC on mobile). This is why youmustchoose the correct type.
Step 3: Assign it to the Material
In the material (Standard, URP/Lit, HDRP/Lit...)find theNormal Mapslot and drag the texture in:
Material Inspector:
  ├── Albedo (Base Map)      ← Màu sắc
  ├── Metallic / Smoothness  ← Chất liệu
  ├── Normal Map             ← KÉO VÀO ĐÂY
  │     └── Strength: 1.0    ← Điều chỉnh độ mạnh (0 = tắt, >1 = cường điều)
  └── ...
Concrete example — Brick wall
1. Model: Một plane phẳng (2 triangle)
2. Albedo: Ảnh tường gạch có màu sắc
3. Normal Map: Ảnh normal map của gạch (tông xanh tím)
4. Kết quả: Tường trông lồi lõm, có bóng giữa các viên gạch
   → Chỉ tốn 2 triangle thay vì hàng nghìn!
5. Normal Map Strength (Strength)
In the material, you will see the sliderStrength (orNormal Scalein URP/HDRP):
| Value | Effect |
|---|---|
| 0 | Completely off, the surface is completely flat |
| 0.5 | Subtle effect, subtle |
| 1.0 | Default, exactly as the artist designed |
| 2.0+ | Exaggerated, details are clearer but may look fake |
In Shader Graph / code:
// Trong shader, bạn điều chỉnh strength bằng cách lerp với (0,0,1)
float3 normal = UnpackNormal(tex2D(_BumpMap, uv));
normal.xy *= _BumpScale;  // _BumpScale = strength
normal.z = sqrt(1.0 - saturate(dot(normal.xy, normal.xy)));
6. Create Normal Map from Height Map (Grayscale)
If you only have a grayscale image (white = high, black = low), Unity can generate a Normal Map automatically:
Import Settings:
  Texture Type: Normal map
  ☑ Create from Grayscale     ← Tick vào
  Bumpiness: 0.5              ← Điều chỉnh độ mạnh
  Filtering: Sharp / Smooth
This is convenient, but the quality is lower thana Normal Map created by specialized software (Substance, xNormalBlender).
7. Normal Map in each Render Pipeline
Built-in Render Pipeline
Material: Standard Shader
Slot: Normal Map (với _BumpMap)
Property trong code: _BumpMap, _BumpScale
URP (Universal Render Pipeline)
Material: Lit Shader
Slot: Normal Map (với _BumpMap)
Property trong code: _BumpMap, _BumpScale
Lưu ý: Cần bật keyword _NORMALMAP trong shader
HDRP (High Definition Render Pipeline)
Material: Lit Shader
Slot: Normal Map
Hỗ trợ thêm: Detail Normal Map (lớp chi tiết thứ 2)
               Bent Normal Map (cho ambient occlusion chính xác hơn)
Shader Graph
Use theNormal Mapnode orSample Texture 2Dthen connect it to theNormal (Tangent Space):
[Sample Texture 2D] → [Normal Unpack] → Fragment: Normal (Tangent)
         ↑
   _NormalMap texture
output
- Detail Normal Map — Add a second layer of detailUnity supportsDetail Normal Map (— a second Normal Map that is tiled) repeated
more times to add fine detail.
- Example:
- Main Normal Map: Large wood grain
Material Inspector:
  ├── Normal Map           ← Chi tiết lớn
  ├── Detail Normal Map    ← Chi tiết nhỏ (tile cao hơn)
  │     └── Tiling: 10x10
  └── Detail Mask          ← Ảnh xám quyết định vùng nào hiện detail
Detail Normal Map: Tiny wood fibers, repeated 10 times
Result: The surface has both large structure and small details — very realistic. (9. Blending Normal Maps)
Blend multiple Normal Maps+ When you need to blend 2 (Normal Map)for example: terrain with multiple layers
, there are 3 methods: (Linear Blending)
float3 blended = normalize(n1 + n2);
Simple, less accurate (Partial Derivative Blending)
float3 blended = normalize(float3(n1.xy + n2.xy, n1.z * n2.z));
Better (Reoriented Normal Mapping — RNM)
float3 t = n1 * float3(1, 1, 1) + float3(0, 0, 1);
float3 u = n2 * float3(-1, -1, 1);
float3 blended = normalize(t * dot(t, u) - u * t.z);
BestRecommendation:Use RNM if quality is important. In Shader Graph, use the node of (select Reoriented mode).
10. Normal Maps and Mobile — Performance Optimization
Compression
| Platform | Recommended format | Notes |
|---|---|---|
| Android | ASTC 6x6 | Balanced quality/size |
| iOS | ASTC 4x4 or 6x6 | ASTC well supported |
| PC | DXT5nm (BC5) | Highest quality |
Reduce size
- Normal Maps are usually acceptable at512x512or1024x1024on mobile.
- It is not necessary to use 2048 for Normal Maps unless the object is very large and the camera is very close.
Disable Normal Maps when not needed
// Tắt Normal Map ở runtime để tiết kiệm hiệu năng trên thiết bị yếu
material.DisableKeyword("_NORMALMAP");
material.SetTexture("_BumpMap", null);
11. Common errors and how to fix them
❌ Error 1: Normal Map looks wrong, the surface is convex instead of concave
**Cause:**Wrong coordinate system. DirectX uses Y+ downward, OpenGL uses Y+ upward.
Fix:
Import Settings → Tick "Flip Green Channel"
Hoặc: Trong phần mềm tạo Normal Map, export đúng format cho Unity (OpenGL).
Memory aid:Unity usesOpenGL style (Y+ up). If the Normal Map is from Unreal/DirectX, you need to flip the Green channel.
❌ Error 2: Texture Type is set incorrectly to "Default"
**Symptom:**The surface looks strange, with a purple-blue color instead of bumps and dents.
**Fix:**ChangeTexture TypetoNormal mapin Import Settings.
❌ Error 3: UV seam (seam lines) are clearly visible on the model
**Cause:**At UV seams, tangent space is interrupted.
Fix:
- Make sure the model is exported with tangent and binormal.
- In Unity:
Import Settings → Normals: Import(do not leave Calculate). - UseMikk tangent space (the default of Unity) when baking in 3D software.
❌ Error 4: Normal Map has no effect
Possible causes:
- There is no light in the scene.
- The shader does not support Normal Maps.
- Keyword
_NORMALMAPhas not been enabled yet.
Fix:
// Kiểm tra keyword
Debug.Log(material.IsKeywordEnabled("_NORMALMAP"));
// Bật thủ công
material.EnableKeyword("_NORMALMAP");
❌ Error 5: Effect too strong / too weak
Fix:Adjust theNormal Strengthslider in the material (value 0 → 2).
12. Bake a Normal Map from High-poly to Low-poly
This is the most common workflow for creating high-quality Normal Maps:
Quy trình:
1. Tạo model High-poly (hàng triệu polygon) → Chi tiết đầy đủ
2. Tạo model Low-poly (vài trăm/nghìn polygon) → Dùng trong game
3. Bake: "Chuyển" chi tiết từ high-poly sang normal map cho low-poly

Công cụ phổ biến:
  - Substance Painter / Designer
  - xNormal (miễn phí)
  - Blender (tích hợp sẵn)
  - Marmoset Toolbag
Notes when baking:
- Low-poly and high-poly mustmatchposition.
- Usecage (cage enclosure) to control the ray casting distance.
- Export with .Mikk tangent spaceto match Unity.
13. Normal Map in Shader Code
Reading a Normal Map in a Surface Shader (Built-in)
Shader "Custom/NormalMapExample"
{
    Properties
    {
        _MainTex ("Albedo", 2D) = "white" {}
        _BumpMap ("Normal Map", 2D) = "bump" {}
        _BumpScale ("Normal Strength", Range(0, 2)) = 1.0
    }
    SubShader
    {
        Tags { "RenderType"="Opaque" }
        CGPROGRAM
        #pragma surface surf Standard fullforwardshadows

        sampler2D _MainTex;
        sampler2D _BumpMap;
        float _BumpScale;

        struct Input
        {
            float2 uv_MainTex;
            float2 uv_BumpMap;
        };

        void surf (Input IN, inout SurfaceOutputStandard o)
        {
            o.Albedo = tex2D(_MainTex, IN.uv_MainTex).rgb;

            // UnpackScaleNormal: giải nén + áp dụng strength
            o.Normal = UnpackScaleNormal(tex2D(_BumpMap, IN.uv_BumpMap), _BumpScale);
        }
        ENDCG
    }
}
In URP Shader (HLSL)
// Sample normal map
float4 normalSample = SAMPLE_TEXTURE2D(_BumpMap, sampler_BumpMap, uv);
float3 normalTS = UnpackNormalScale(normalSample, _BumpScale);

// Chuyển từ tangent space sang world space
float3 normalWS = TransformTangentToWorld(normalTS,
    float3x3(input.tangentWS, input.bitangentWS, input.normalWS));
14. Comparing Normal Map with Other Techniques
| Technique | Detail | Performance | Changes silhouette? | Used when |
|---|---|---|---|---|
| Normal Map | Medium | Cheap | ❌ No | Most things |
| Bump Map | Low | Very cheap | ❌ No | Simple effects |
| Parallax Map | High | Medium | ❌ No (but with an illusion) | Floors, walls viewed up close |
| Displacement Map | Very high | Expensive | ✅ Yes | Terrain, cinematic |
| Tessellation + Displacement | Very high | Very expensive | ✅ Yes | AAA, next-gen |
Additional explanation
- **Bump Map:**An early version, using only 1 (grayscale)channel. Normal Map is an upgraded version.
- **Parallax Map:**Adds UV offset effects based on viewing angle, creating a "deeper" feeling than a Normal Map.
- **Displacement Map:**Actually displaces vertices → the silhouette really changes, but it requires many polygons.
15. Strengths & Weaknesses
✅ Strengths
- **Low performance cost:**Almost no additional cost compared to not using it (only adds 1 texture sample).
- **High quality:**Creates a very convincing illusion of 3D detail from most viewing angles.
- **Flexible:**Can be used for all kinds of objects — characters, environments, props.
- **Polygon saving:**Greatly reduces the number of polygons needed → the game runs more smoothly.
- **Easy to use:**Unity supports it out of the box; just drag and drop.
❌ Weaknesses
- **Does not change silhouette:**Viewed from the side, the object is still flat. This is the biggest limitation.
- **Shallow viewing angle:**When the camera looks nearly parallel to the surface, the effect looks "flat."
- **Does not self-shadow:**The details in the normal map do not cast shadows on themselves (self-shadowing). Another technique is needed.
- **Lighting-dependent:**In an environment without a light (unlit shader), the Normal Map is useless.
- **UV dependency:**Quality depends on a good UV unwrap.
16. Tips & Best Practices
For artists
- Always export OpenGL the formatfor Unity (Y+ up).
- Use Mikk tangent spacewhen baking — it matches Unity.
- Don’t use JPEGfor Normal Maps — compression artifacts will create noise. UsePNGorTGA.
- Padding UV islandsby at least 4-8 pixels to avoid seams when mipmapping.
For programmers
- Always set Texture Type = Normal Mapwhen importing.
- Use
UnpackNormal()orUnpackNormalScale()— don’t read RGB yourself and convert manually. - Enable keyword
_NORMALMAPif you set the texture by code. - Reduce Normal Map size on mobile— 512 is usually enough for most objects.
For both
- Test with a directional light rotating around— this is the best way to see the Normal Map working.
- Don’t set the strength too high— a value of 0.8 - 1.2 is usually best.
- Combine with an AO map (Ambient Occlusion) to add depth.
17. Example script: Changing the Normal Map at runtime
using UnityEngine;

public class NormalMapSwitcher : MonoBehaviour
{
    [Header("Normal Maps")]
    [SerializeField] private Texture2D normalMapDry;
    [SerializeField] private Texture2D normalMapWet;

    [Header("Settings")]
    [SerializeField, Range(0f, 2f)] private float normalStrength = 1f;

    private Material _material;

    private void Start()
    {
        // Lấy material instance (tạo bản copy để không ảnh hưởng asset gốc)
        _material = GetComponent<Renderer>().material;
    }

    /// <summary>
    /// Chuyển sang Normal Map ướt (ví dụ: khi trời mưa)
    /// </summary>
    public void SetWet()
    {
        SetNormalMap(normalMapWet);
    }

    /// <summary>
    /// Chuyển sang Normal Map khô
    /// </summary>
    public void SetDry()
    {
        SetNormalMap(normalMapDry);
    }

    private void SetNormalMap(Texture2D normalMap)
    {
        if (normalMap == null)
        {
            // Tắt Normal Map
            _material.DisableKeyword("_NORMALMAP");
            _material.SetTexture("_BumpMap", null);
        }
        else
        {
            // Bật Normal Map
            _material.EnableKeyword("_NORMALMAP");
            _material.SetTexture("_BumpMap", normalMap);
            _material.SetFloat("_BumpScale", normalStrength);
        }
    }

    private void OnDestroy()
    {
        // Dọn dẹp material instance tránh memory leak
        if (_material != null)
            Destroy(_material);
    }
}
18. Packed Texture — Normal Map combined with another texture
In AAA games and optimized mobile games, people oftenpackmultiple pieces of information into one texture:
Ví dụ format phổ biến:
  R: Metallic
  G: AO (Ambient Occlusion)
  B: không dùng / Detail Mask
  A: Smoothness

  → Normal Map để riêng (vì cần format compression đặc biệt)
Unity URP/HDRPby default usesMetallic-Smoothness packed (Smoothness in the Alpha channel of the Metallic map). Normal Maps are always kept separate because they require a specialized compression format (BC5/ASTC).
19. Quick checklist when using Normal Maps
☐ Texture Type đã set thành "Normal map"?
☐ File ảnh là PNG/TGA (không phải JPEG)?
☐ Đúng hệ toạ độ OpenGL (Y+ hướng lên)?
☐ Material có slot Normal Map và đã gán?
☐ Scene có ít nhất 1 light source?
☐ Shader hỗ trợ Normal Map?
☐ Kích thước texture phù hợp (mobile: 512, PC: 1024-2048)?
☐ Normal Strength ở mức hợp lý (0.8 - 1.2)?
☐ Không bị seam ở đường nối UV?
Summary
Normal Maps are anindispensable toolin the modern game graphics pipeline. They help you:
- Add 3D detail that isalmost freein terms of performance.
- Significantly reduce polygon count.
- Raise visual quality by several levels.
The main limitation isthey do not change the silhouetteandthey depend on lighting. But for most games (especially mobile), Normal Maps are the most optimal choice between quality and performance.
**Rule of thumb:**If that detail is smaller than 1-2cm in the game → use a Normal Map. If it is larger and affects the silhouette → you need real geometry.